How To Make Smart Business Cards Through 3D Printing
Almost every professional person may benefit from having business cards on hand, whether they work in the arts, in the tech industry, or even as a professional 3D printer. While having these cards made by a professional business is the norm, you typically end up with a copy-pasted design that uses images that have been used on hundreds, if not thousands, of other greeting cards. This is where 3D Printed Business Cards are going to save the day for you. Whether you want metal business cards or card ones, 3D printing works on all and is the best digital business card.
What better way to advertise your innovative skills than with 3D Smart Business Cards? Advertise your business in a fresh and original way with 3D cards. It’s a certain way to win over prospective clients and collaborators.
Reasons for Selecting 3D (three-dimensional) Printing For Smart Business Card
Saving money is crucial to the success of any business. One benefit of a 3D professional business card printer is that it helps save money. Labor, supplies, and energy to run machinery all add up to total expenditures.
Reduced waste costs and environmental impact caused by traditional production processes. 3D printing is novel because it minimizes waste by only using a small amount of raw materials.
You can save money on transportation by having your 3D business card printed on a 3D printer. A customized greeting card can be made by the printers and sent out via email.
Most businesses have adopted 3D printing technology since it allows them to utilize a wide range of durable materials in their promotional materials, as well as various business card size in inches.
We live in a fast-paced, efficient environment. In this respect, 3D printing is unique. Faster production times than conventional methods are a major advantage of this approach to manufacturing goods and components. Even complex procedures can be constructed and reshaped in a matter of minutes.
Maintaining a competitive advantage is essential to business success, so make sure you stay one step ahead of the competition. You may quickly reach out to business associates and clients with the use of 3D smart business card.
Step-By-Step Process of Making 3D-printed Business Cards
First Step: Making a Lithophane Portrait
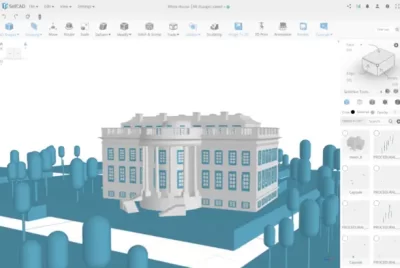
First off, make the portrait. For that, you’ll be using Thingiverse, as it’s the best program for 3d printing designs. Open this page in the “customizer,” then reduce the size of the open Pane by clicking on the corresponding button. Choose a jpg file to serve as the image for your business card, and then select the invert colors button located at the screen’s bottom. Your company’s logo or some other captivating image.
After the file has been uploaded, select “create thing” from the bottom right, and give the Lithophane a name. Don’t rush the app when it’s making the app. When finished, select “My Things” from the menu that drops down from the upper right corner.
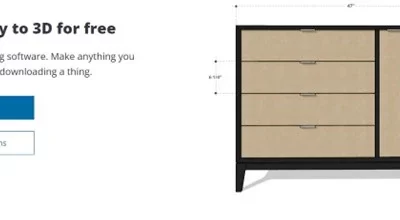
Second Step: Make The Base for the Smart Business Card
You should personalize all of your business cards. This occurs in the first and second steps. Tinkercard (the best program to design 3d prints) can be used as a starting point for making a business card. Launch the app and make something new. Select “Shape Generators,” then the red box, and bring it into your working space by dragging and dropping it there.
Select Grid and Ruler from the main menu. Place it on the workspace next to the red box, and then click. To reveal the dimensions and make adjustments, click the red box. To adjust the proportions, select the width option and enter “89” into the text field. For adjust the height, enter 51 and the width should be 1. These are the typical dimensions for a business card.
Third Step: Add Text To The Card
A business card without text is incomplete. It’s simple to add the wording. To add text to your workspace, click the Text button on the toolbar. A text box and a name field appear in the inspector window. Use the ruler to set the parameters to 5mm in height, 0.5mm in thickness, and 40mm in width.
The next step is to center the card’s text at its highest point. Simply move it till it fits perfectly. To have the words appear on top of your new workspace, hit “d” on your keyboard. This text symbol now supports Twitter handles, titles, email fields, and phone numbers. To finish, use the “Group” option from the toolbar and group the text and card base together.
Fourth Step: Import Lithophane Picture
After you’ve set up your workplane and placed the text where you want it, you can bring in your finished Lithophane image. So as to accomplish this;
- Locate the Thingiverse download you made in the past.
- Select “Import” and wait a few moments to upload from the app.
- You can adjust the size of the image by dragging the small white squares located in the four corners.
- Then, flatten the top loop and smooth the elevated edges. Select the letter “I” from the “Letters” drop-down menu on the right side of the toolbar, and drop it where you’d like it to appear on your desk. Do that three more times.
- Make “I” big enough that it completely engulfs each protruding edge. Keep your distance from the floor of the work surface.
- Select Hole from the inspection box on the top right after clicking on each “I” letter.
- Create a square or rectangle using the mouse to enclose the Lithophane.
Step Five: Have Business Cards Printed
The final step, after you’ve finished designing your card, is to print it off. Keep the 3D printer STL file and business card, or forward them both to a 3D printing provider. Access the Design menu to save the business card to your computer for future use. To convert to.STL or.OBJ file for use with a 3D printer, select Design > Download for 3D Printing.
Final Thoughts
3D printing is among the most promising technologies due to recent advancements. Layer-by-layer, 3D printing offers new possibilities for product development and promotion over more conventional approaches. Several distinct 3D printing methods are currently accessible to make smart business cards. The rapid prototyping and precision manufacturing capabilities of 3D printing make it particularly useful for business cards.
Read more about 3D world at 3D Printing Hive